ENVI Feature Assistant Classification Tutorial
In this tutorial you will use the ENVI Feature Assistant to interactively locate features in imagery using natural language. You will locate features of various sizes using the Feature Assistant Tool and fine-tune the parameters to establish settings that can be used to locate the same features in similar raster imagery.
See the following sections:
System Requirements
Refer to the System Requirements topic.
Files Used in This Tutorial
Sample data files are available on our ENVI Tutorials web page. Click the Deep Learning link in the ENVI Tutorial Data section to download a .zip file containing the data. Extract the contents of the .zip file to a local directory. The file for this tutorial is located in the object_detection folder.
The image used in the tutorial is a spatial subset of a orthorectified aerial image provided by the Denver Regional Council of Governments (DRCOG) Regional Data Catalog (https://data.drcog.org). The image is in the public domain. License terms are governed by CC BY 3.0 (http://creativecommons.org/licenses/by/3.0).
The image has three bands (red/green/blue) with a spatial resolution of 0.4921 U.S. Survey Feet.
|
File |
Description |
|
ImageToClassify.dat
|
DRCOG image (10,000 x 10,000 pixels) used for classification
|
Background
Modern satellite imagery contains an extensive amount of information; finding specific objects or features within it typically requires large sets of training examples and time-consuming manual work. ENVI Feature Assistant simplifies this process by letting you describe what you are looking for in natural language, without the need to train deep learning models.
Feature Assistant uses two AI models to identify features in remote sensing workflows:
- Grounding DINO is an object detection model that can detect objects based on text prompts. This enables you to search for features such as solar panels, aircraft, shipping containers, and buildings without the need for model training
- Segment Anything 2 (SAM 2) takes the objects that were found by Grounding DINO and traces their exact outlines. Instead of drawing a simple box around an object, it identifies the precise shape of objects and produces feature masks that can be used for measurement, classification, and geospatial analysis.
Using the Feature Assistant Tool, the Grounding DINO and SAM 2 models work together to perform intelligent feature extraction as follows:
- You provide a text prompt that describes the feature to find.
- Grounding DINO scans the image and identifies regions that match your description.
- SAM 2 segments the detected objects to create feature outlines.
- ENVI converts the results into geospatial products, enabling further analysis, visualization, and integration into GIS workflows.
The iterative workflow of the Feature Assistant Tool allows you to set detection parameters, interactively evaluate the results, and refine the search to improve the detection of features within a scene. The Feature Assistant Tool is particularly useful when searching for complex, variable, or visually similar objects that may require multiple parameter adjustments to achieve ideal results.
Note: Grounding DINO and Segment Anything 2 (SAM2) models were trained using RGB-composite data. Feature Assistant will automatically prepare data rasters using the optimal display bands creating a 3-band raster for processing.
Getting Started
When ENVI Feature Assistant is installed, a new icon is added to the ENVI toolbar  . The icon starts the interactive tool of ENVI Feature Assistant.
Set Preferences
If this is the first time you are using Feature Assistant, check the parameter settings for GPU selection, processing precision, and the server-client communication port. Refer to the Preferences topic for details.
Launch the Feature Assistant Tool
When you launch the Feature Assistant Tool, it will use an 800 x 800 analysis window centered on the current ENVI View to perform detection and segmentation.
Follow these steps:
- Start ENVI.
-
From the ENVI main menu, select File > Open. The Open dialog appears. Navigate to the location where you downloaded the Deep Learning tutorial data and select ImageToClassify.dat from the object_detection folder, then click the Open button. The image opens in the View.
-
Click the Feature Assistant Tool button  . ENVI displays the following dialog, which shows that Feature Assistant is initializing.
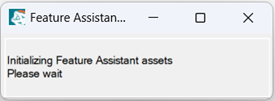
Initialization steps include validating the configured NVIDIA GPU and establishing communication between the local client and server components through the designated communication port. When initialization is complete, a command shell window remains open in the taskbar. Do not close this window; the command shell hosts the local server process that loads and maintains the AI models in memory and listens for incoming requests from ENVI.
When initialization is complete, the Feature Assistant Tool dialog appears:
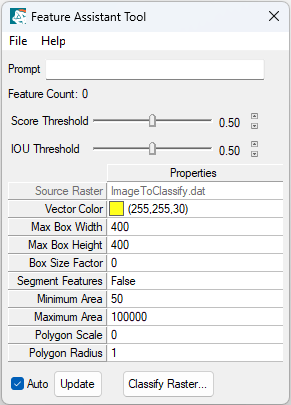
Prepare Image Data
Verify that the raster displays as expected and that target features are clearly visible within the View with these steps:
- Move the Feature Assistant Tool to the side or move it to another display if you have multiple monitors.
-
Apply a stretch to the raster. From the Stretch drop-down list in the ENVI Toolbar, select Optimized Linear.
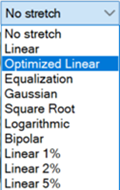
The image will display with higher contrast using the optimized stretch in the View.
-
Change the image resolution. From the Zoom drop-down list in the ENVI Toolbar, select Use Map Scale:
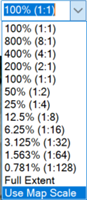
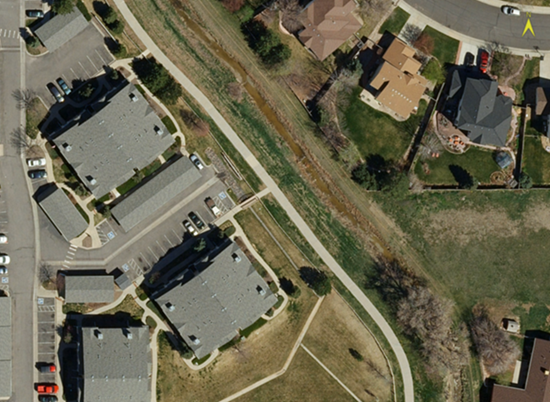
For high-resolution imagery with a pixel size of approximately 0.15 m (0.49 ft) such as this image, a map scale between 1:1,500 and 1:4,000 typically provides the best balance between feature detail and scene context. A scale of 1:2,500 will be a good starting point.
At large zoom-ins (such as 100% (1:1) or 1:670), a typical house may occupy hundreds of pixels, which can be too detailed and limit the contextual information available to models. At this scale, an object can be detected, but for a broader full-raster classification, the effort would be time-consuming.
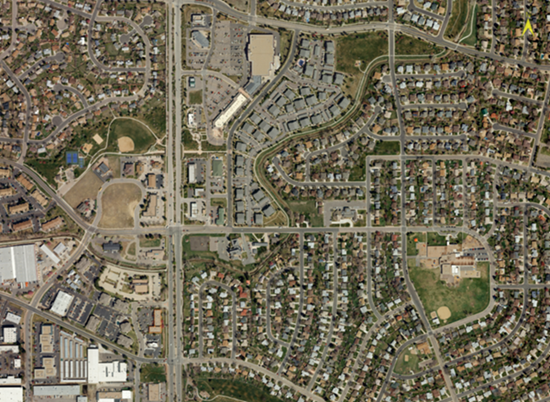
At small scales (such as 1:10,000), objects become too small relative to the analysis window.
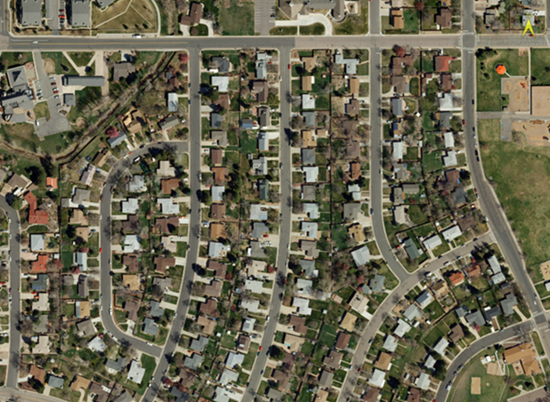
- In the ENVI Toolbar, change the Zoom value by entering 1:2,500 in the field and press the Enter key. ENVI zooms out, providing more context and many buildings with detail.
-
In the Go To field of the ENVI Toolbar, enter (or copy/paste) the coordinates 39.9273876N,105.0858557W and press Enter. The View updates to the geographic coordinates, displaying a portion of a residential neighborhood. You will use this scene to locate buildings.
Locate Objects
This section guides you through configuring detection parameters, understanding how scale and image presentation affect results, and how to use the controls to refine feature detections.
You will learn how to locate the following objects:
Because the viewing area of Feature Assistant is an 800 x 800 center within the ENVI View, features outside the analysis area will appear unclassified. You first use Feature Assistant Tool to adjust parameters to refine feature detection within the analysis area, then you can apply the desired settings to classify the full extent of the raster.
Locate Buildings
With the settings from the Image Data Preparation section applied, follow these steps to detect buildings:
-
In the Prompt field of the Feature Assistant Tool, enter buildings and press the Enter key. Based on the current ENVI View extent, display scale, and monitor resolution, Feature Assistant may or may not identify a single building near the upper-left of the displayed scene. If you select the raster in the Layer Manager, it will change the detection bounding box from the selected cyan color to yellow.
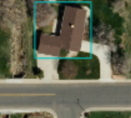
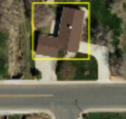
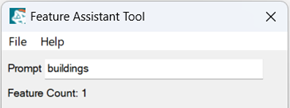
If a detection was generated, the Object Count increases to reflect the number of identified features. In this example, the count increased by one.
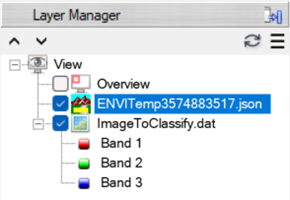
If Feature Assistant has detections, a temporary vector file is added to the Layer Manager. It contains information on the current detections in the View.
By default, Feature Assistant uses a 50% detection score threshold. This threshold represents the model's confidence that a detected feature matches the text prompt. In this step, the detection is based on the visual relationship between the prompt “buildings” and the analysis area in the View. As a result, detections may vary depending on the image resolution, display scale, and scene complexity.
-
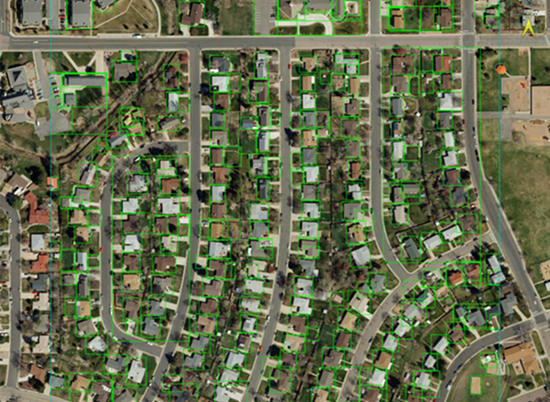
In the Feature Assistant Tool, change the Score Threshold to 0.40 and press the Enter key. Click the down arrow  until you reach 0.40; each click on the down arrow will result in new detections in the View. Click slowly and wait for the detections to update. Many buildings are now selected by yellow bounding boxes and the Feature Count reports the value 247 (your result may vary).
-
To optionally change the Vector Color of the bounding boxes to bright green, select the color (0, 240, 0) from the color palette.
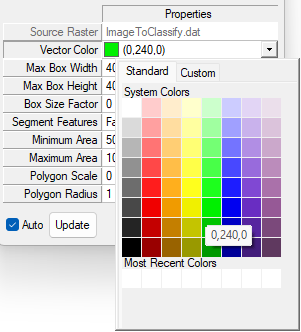
All detections change from yellow to green.
-
Change the IOU Threshold to 0.10. Lowering the IOU (Intersection Over Union) Threshold suppresses redundant detections by reducing the number of overlapping or intersecting bounding boxes generated for the same feature. As a result, the detection output becomes cleaner and easier to interpret.
For example, in the upper-left portion of the image, several overlapping bounding boxes surrounding the same building are removed, leaving a more representative detection and reducing visual clutter. This allows Feature Assistant to focus on distinct objects rather than producing multiple detections for a single feature.
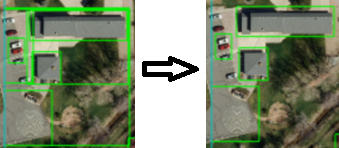
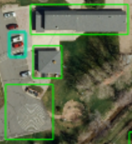
In the above image is a group of vehicles; the lower portion of the parking lot was detected as buildings. This is a result of the Score Threshold at 0.40.
-
In the Layer Manager right click the temporary ENVITemp*.json vector and select View/Edit Attributes.
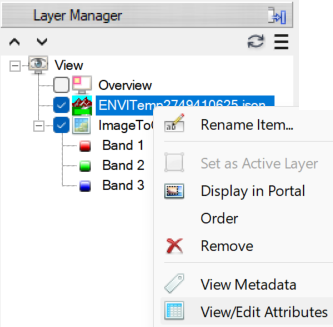
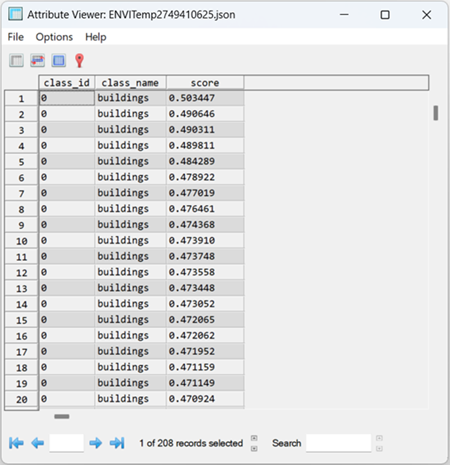
The Attribute Viewer opens, displaying attributes for the current detections.
-
Optionally, from the Attribute Viewer, scroll to record 177 and click on it. In your output, it may vary which record represents the feature  but it should be in the score range around 0.418.

The row for record 177 is highlighted and the associated vehicle is highlighted in a cyan-colored bounding box in the ENVI View.
Take note of the score for detection 177. In this example, it is 0.418126.
-
In the Feature Assistant Tool raise the Score Threshold value to a value above what you noted for row 177 (for example, 0.42), and press Enter. The Attribute Viewer closes and Feature Assistant reprocesses the scene, eliminating all detections with a score below 0.42.
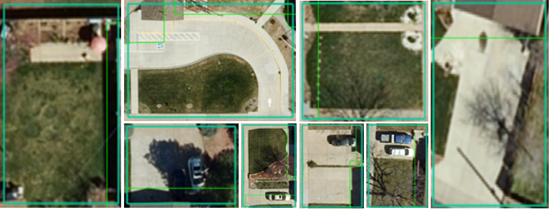
In the example image above are 8 of the 37 features removed by increasing the score threshold. All detections in this example are invalid for the prompt buildings, including yards, driveways, and parking lots.
-
Optionally, open the Attribute Viewer again. It now reports 171 records (your number may vary).
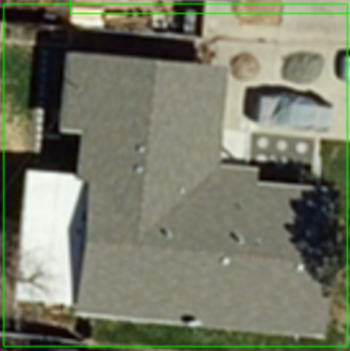
Note: For every false detection removed by parameter changes, zoom resolution, brightness etc., good detections are also removed. For example, changing the score threshold to 0.42 eliminates some buildings with scores in the range of 0.410 to 0.419, as the example below.
-
You will see larger bounding boxes that contain many individual building detections. These detections are not necessarily incorrect because the prompt "buildings" describes multiple structures, which allows the model to identify both individual buildings and collections of buildings as valid matches.
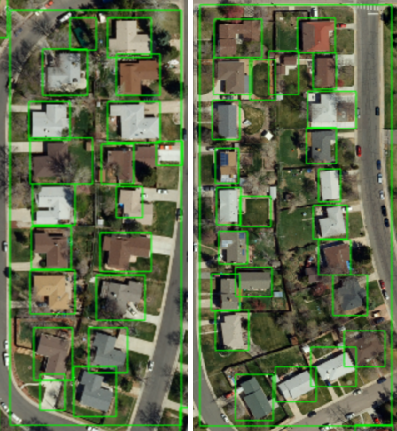
You can change the prompt to the singular word “building” to help reduce some of these larger group detections. For example, with a score threshold of 0.40 and prompt "building," the large bounding box shown in the image on the right would be removed, but a larger detection would remain in the image on the left.
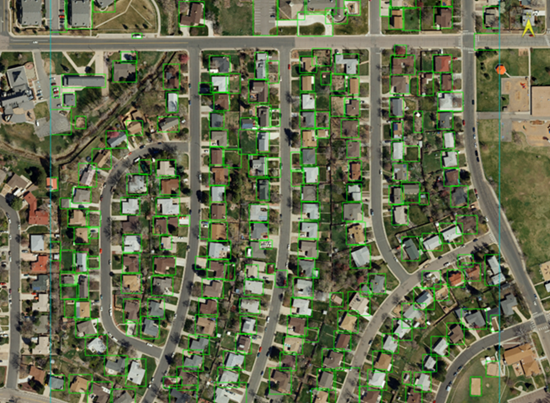
To further refine the results, set the Max Box Width and Max Box Height values in the Feature Assistant Tool to 100.
As each value is updated, the detections in the View automatically refresh. The remaining large bounding box is removed because detections that exceed 100 × 100 pixels are now filtered out. This allows Feature Assistant to focus on individual building detections while suppressing broader detections that encompass multiple structures.
-
In the Feature Assistant Tool, disable the Auto check box.
Disabling automatic updates prevents the View from constantly updating whenever you pan, zoom, or change parameter settings. This is helpful when you are experimenting with different prompts, thresholds, display scales, and image enhancement settings. You can manually refresh the changes in the View by clicking the Update button.
Explore the scene by zooming and panning around the current detection area. The active analysis region is outlined by the cyan bounding box, allowing you to examine features in greater detail while preserving the current set of detections.
As you explore, observe how different scene elements influence detection results. Features such as parking lots, roads, rectangular yards, and rooftops often share visual characteristics, including straight edges, rectangular shapes, sharp boundaries, and repetitive patterns. These similarities can sometimes lead to false positive or unexpected detections. Experimenting with scale, prompts, thresholds, and size constraints can help refine the results and improve the separation of buildings from visually similar features.
-
Now run the classification on the full raster extent. Use the following settings:
In the ENVI Toolbar:
In the Feature Assistant Tool:
- Prompt: building
- Score Threshold: 0.42
- IOU Threshold: 0.10
- Max Box Width: 100
- Max Box Height: 100
-
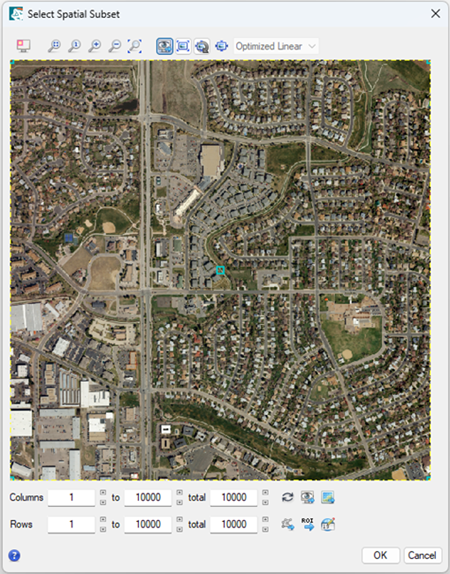
Click the Classify Raster button. The Spatial Subset dialog appears, showing the complete 10,000 x 10,000 raster for processing. Keep the default settings and click OK.
- The Please Select a File for Writing dialog appears. You can optionally specify an output folder and filename for the .shp output vector and click Save. If you do not specify a output folder or filename, the file is saved in the default temporary location.
-
The classification process begins and a progress dialog appears displaying the percentage of processing completed.
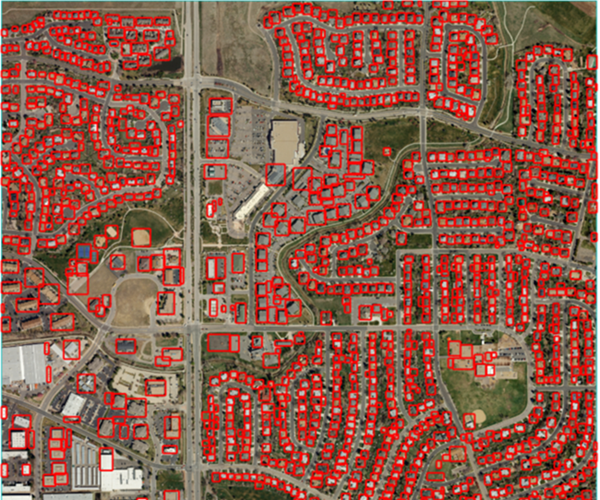
When classification is complete, a shapefile that contains all detections in the full raster extent displays in the View. In the example below, the model successfully identified numerous residential buildings and several larger structures. However, false positives remain and not all buildings were detected. Detection accuracy can often be improved through further refinement of the workflow, including optimization of the processing scale, pixel resolution, and Feature Assistant Tool parameters. Careful tuning of these settings can significantly reduce false positives while improving overall feature extraction performance.
Based on the zoom level, processing times may be increased or decreased. The more you zoom in, the longer the processing time. The farther you zoom out, the faster the processing time. If you zoom too close or too far, Feature Assistant will not detect any features.
-
When finished, shut down the Feature Assistant server and assets. In the Feature Assistant Tool click File > Shutdown Assets.
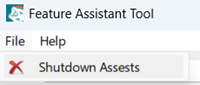
ENVI displays a message that Feature Assistant is shutting down.
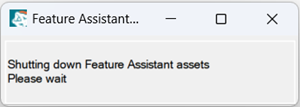
It is important to properly shut down Feature Assistant assets before you exit ENVI, to avoid error message dialogs.
Locate Red Vehicles
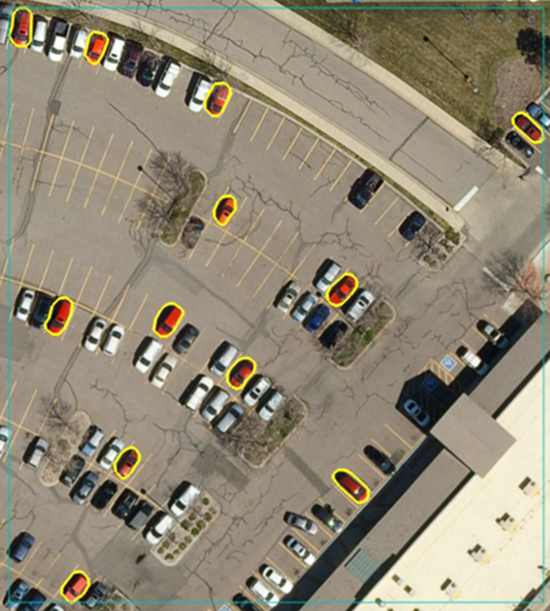
This section demonstrates how to detect smaller objects, specifically red vehicles. It also introduces the Segment Features option, which enables the model to generate feature outlines that more closely represent the shape of detected objects.
Use the following steps:
- Open ImageToClassify.dat and apply an Optimized Linear stretch.
-
In the ENVI Toolbar:
-
Start the Feature Assistant Tool and enter the following values:
- Score Threshold: 0.47
- IOU Threshold: 0.10
- Max Box Width: 100
- Max Box Height: 100
Until you enter text in the Prompt field, the View will not update to show feature detections.
-
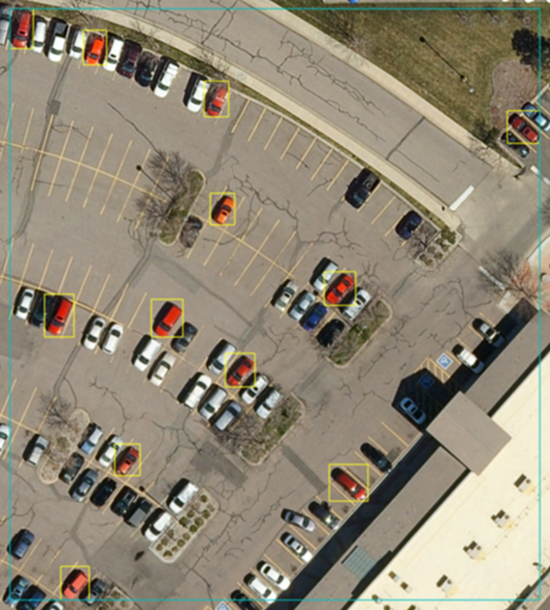
Enter the red vehicles in the Prompt and press Enter.
Feature Assistant updates the View, drawing a yellow bounding box around all red vehicles in the display and the Feature Count displays 12 detections (your results may vary).
-
Disable the Auto check box in the Feature Assistant Tool.
When you enable the Segment Features option in the next step, it increases the computational demands of the processing workflow and may result in longer processing times.
-
Set the following in the Feature Assistant Tool:
- Segment Features: True (delineates feature pixels inside bounding box detections)
- Polygon Radius: 3 (increases the radius of the segment outline smoothing the contour)
-
Click the Update button in the Feature Assistant Tool. Features are now outlined inside the object bounding box, providing a more precise feature and feature location in the raster.
-
In the Layer Manager, right-click the ENVITemp*.json file and select Properties. The Vector Properties dialog appears:
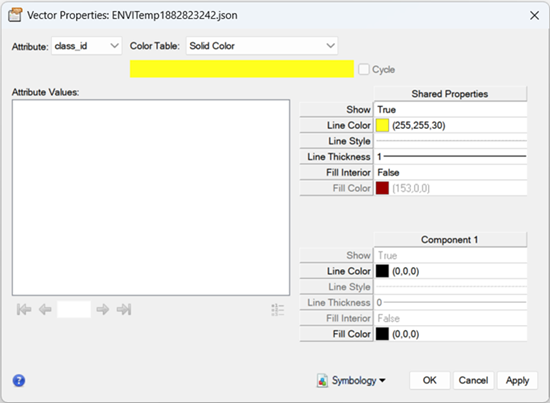
- Under Shared Properties, change the Line Thickness to 3 and click Apply. The segment outlines increase to 3 pixels thick, making the detection outlines easier to view.
Locate Handicap Parking Signs
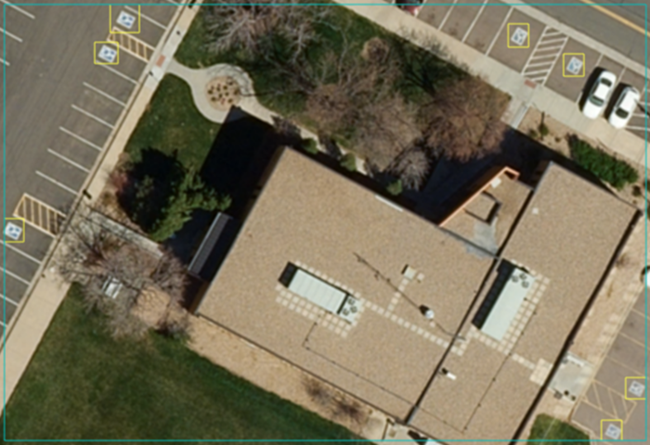
This section demonstrates how to detect handicap parking signs, one of the smallest features in ImageToClassify.dat. At the raster's native resolution, a handicap sign spans approximately 13 pixels diagonally (from corner to corner), whereas vehicles occupy 30 or more pixels from front to rear. Handicap signs present a more challenging detection task due to their smaller size, varying orientations, and differences in appearance throughout the dataset.
This section provides recommended settings for two regions that contain handicap signs to illustrate how appropriate parameter selection can improve the identification of small, visually variable features while minimizing false detections.
- Open ImageToClassify.dat and apply an Optimized Linear stretch.
-
Below are two sets of settings for locating handicapped parking signs.
Handicap Parking Signs A:
In the Layer Manager select ImageToClassify.dat and set the following in the ENVI Toolbar:
- Zoom To: 1:446
- Go To: 39.9233123N,105.0876729W
In the Feature Assistant Tool, enter the following settings. Press Enter after entering the prompt and click the Update button.
- Auto: Off
- Prompt: handicap sign
- Score Threshold: 0.40
- IOU Threshold: 0.10
- Max Box Width: 30
- Max Box Height: 30
- Segment Features: False
Handicap Parking Signs B:
In the Layer Manager select ImageToClassify.dat and set the following in the ENVI Toolbar:
- Zoom To: 1:350
- Go To: 39.9292923N,105.0853314W
In the Feature Assistant Tool enter the following settings. Press Enter after entering the prompt and click the Update button.
- Auto: Off
- Prompt: handicap sign
- Score Threshold: 0.41
- IOU Threshold: 0.10
- Max Box Width: 30
- Max Box Height: 30

Locate Road Directional Arrows
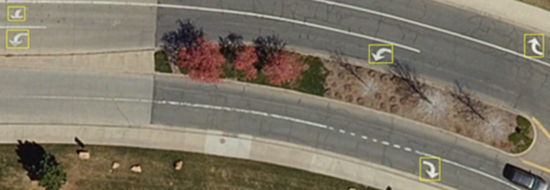
This section demonstrates how to detect another small but distinguishable feature in the raster: road directional arrows. Although these markings vary in size, orientation, and condition, their distinctive shape makes them suitable candidates for detection using the Feature Assistant Tool. The following steps outline the recommended workflow and parameters for locating road directional arrows within the dataset.
- Open ImageToClassify.dat and apply an Optimized Linear stretch.
- Enter the following settings:
In the Layer Manager select ImageToClassify.dat and enter these settings in the ENVI Toolbar:
- Zoom To: 1:446
- Go To: 39.9343776N,105.0899136W
In the Feature Assistant Tool enter the following settings. Press Enter after entering the prompt and click the Update button.
- Auto: Off
- Prompt: arrow
- Score Threshold: 0.42
- IOU Threshold: 0.10
- Max Box Width: 100
- Max Box Height: 100
Locate a Person
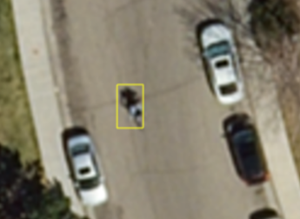
This section will try to detect what is one of the most challenging features in this tutorial: a single person. Due to the small size of people relative to the raster resolution and the variations in appearance, pose, shadows, and surrounding background features, accurately identifying people can be difficult and will require careful parameter tuning. The following steps demonstrate an approach for locating people within the dataset.
- Open ImageToClassify.dat and apply an Optimized Linear stretch.
- Enter the following settings:
In the Layer Manager select ImageToClassify.dat and enter these settings in the ENVI Toolbar:
- Zoom To: 1:300
- Go To: 39.9265921N,105.0920137W
In the Feature Assistant Tool enter the following settings. Press Enter after entering the prompt and press the Update button.
- Auto: Off
- Prompt: person
- Score Threshold: 0.46
- IOU Threshold: 0.10
- Max Box Width: 50
- Max Box Height: 50
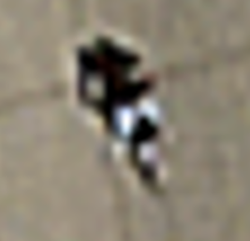
Based on the visual characteristics of the detected feature, including its shape, posture, and associated shadow, the object appears to be a person walking along the street and may be carrying a backpack. However, this interpretation is based solely on image appearance and should be considered speculative, as the available imagery does not provide sufficient detail to reliably determine additional characteristics or context.
The image on the left shows the detection at a 1:300 display scale, while the image on the right provides a closer view of the same feature at 1:89 scale with image sharpening applied to enhance visibility.
Locate an Open Car Door
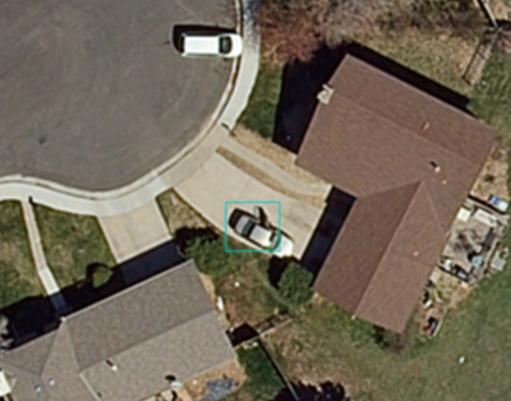
This next section demonstrates the detection of another specific feature: an open vehicle door. Unlike general object detection tasks, such as identifying vehicles or buildings, this workflow focuses on recognizing a particular condition or state of an object.
Detecting features this specific illustrates the flexibility of Feature Assistant, which can identify object types as well as distinct visual characteristics and object conditions. The following example demonstrates how an open vehicle door can be located within the raster using carefully selected search parameters and scene context.
Note: The parameter settings shown below may require adjustment to achieve optimal results. Detection outcomes can vary due to the dynamic behavior of the loaded model weights. As a result, the recommended values are just a starting point, rather than fixed requirements. If additional features are detected or the target feature is not identified, fine-tuning the parameters may be necessary to improve detection accuracy and isolate the desired result.
- Open ImageToClassify.dat and apply an Optimized Linear stretch.
-
Enter the following settings:
In the Layer Manager select ImageToClassify.dat and enter these settings in the ENVI Toolbar:
- Zoom To: 1:446
- Go To: 39.9337559N,105.0913865W
In the Feature Assistant Tool, enter the following settings. Press Enter after entering the prompt and click the Update button.
- Auto: Off
- Prompt: open vehicle
- Score Threshold: 0.42 - 0.44
- IOU Threshold: 0.10
- Max Box Width: 50
- Max Box Height: 50
Multiclass Example
Detecting multiple object types with Feature Assistant is possible, but it is more challenging than searching for a single, well-defined feature. The underlying vision-language model compares text prompts with visual patterns in the imagery to identify potential matches. As the number and diversity of requested features increase, the model must evaluate a broader range of visual characteristics, which can reduce detection confidence and increase the likelihood of missed detections or false positives.
Multi-class detection performance is also influenced by the type of imagery being analyzed. RGB composite imagery is often better suited for multi-class detection because it closely reflects the visual appearance of real-world objects and aligns well with the natural image datasets commonly used to train vision-language models. In contrast, geospatial imagery may contain spectral bands, orthorectification artifacts, variable illumination conditions, or object scales that differ significantly from the model's training data, making it more difficult to distinguish among multiple feature classes simultaneously.
Successful multi-class detection typically depends on clear and descriptive prompts, appropriate processing scales, and iterative refinement of parameters. As a result, some experimentation may be required to achieve optimal results for a given dataset and set of target features. The example below demonstrates a simple multi-class detection workflow using Feature Assistant.
- Open ImageToClassify.dat and apply an Optimized Linear stretch.
-
Enter the following settings:
In the Layer Manager select ImageToClassify.dat and enter these settings in the ENVI Toolbar:
- Zoom To: 1:446
- Go To: 39.9248905N,105.0896373W
In the Feature Assistant Tool, enter the following settings. Press the Enter key after entering the Prompt, then click the Update button.
- Auto: Off
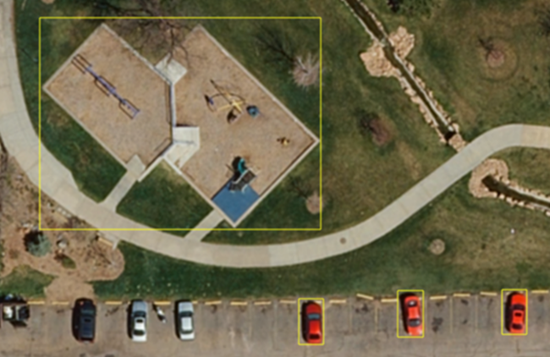
- Prompt: playground, red vehicle
- Score Threshold: 0.40
- IOU Threshold: 0.10
- Max Box Width: 400
- Max Box Height: 400
-
In the Layer Manager right-click the ENVITemp*.json layer and select View/Edit Attributes. The Attribute Viewer displays, showing four detections: 1 playground as class_id0, and 3 red vehicles with class_id 1 (your results may vary).
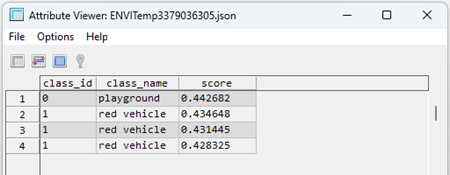
Selecting the record ID’s 1 - 4 will highlight each detection, providing a way to verify what class the model labeled for each detection.
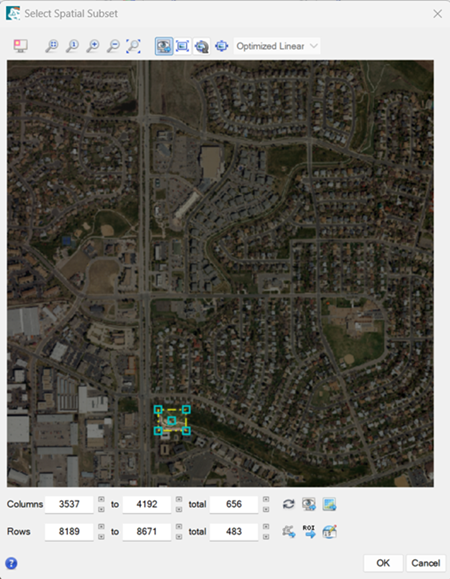
- Click the Classify Raster button. The Select Spatial Subset dialog displays.
-
Click the Use View Extent button  . The Select Spatial Subset dialog updates the current location in the View.
-
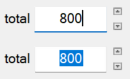
In the Select Spatial Subset dialog, update the total values for columns and rows to 800 and Enter after each. Click OK.
- The Please Select a File for Writing dialog appears. You can optionally specify an output folder and filename for the .shp output vector and click Save. If you do not specify a output folder or filename, the file is saved in the default temporary location.
-
The classification is processed and a new shapefile is displayed in ENVI. The shapefile contains one red bounding box over the playground, and three red vehicles selected by green bounding boxes (your results may vary).
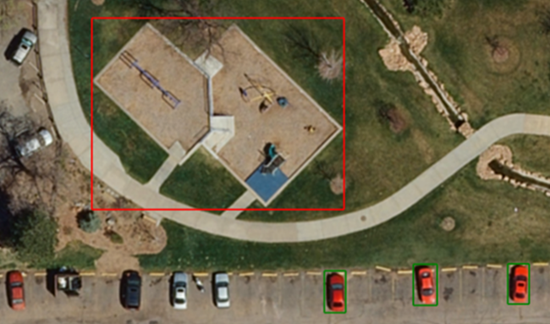
The classification task supports color coding by unique class using ENVI’s default color scheme.
Exploring Further
The following exercises provide additional opportunities to refine your workflow and evaluate model performance across different feature types. They can also serve as inspiration for developing new detection tasks tailored to your own imagery and analytical objectives. Consider exploring the examples below or creating your own feature queries to further assess the flexibility and effectiveness of Feature Assistant.
Features of interest:
| Go To |
Settings |
|
39.9305191N,105.0932072W
|
Zoom To: 1:670
Score Threshold: 0.45 - 0.5
Max Box Width: 400
Max Box Height: 400
Prompt: playground
|
|
39.9280941N,105.0883461W
|
Zoom To: 1:298
Score Threshold: 0.48
Max Box Width: 200
Max Box Height: 200
Prompt: maze
|
|
39.9232206N,105.0801768W
|
Zoom To: 1:670
Score Threshold: 0.47
Max Box Width: 400
Max Box Height: 400
Prompt: baseball stadium
|
|
39.9286005N,105.0832474W
|
Zoom To: 1:670
Score Threshold: 0.49
Max Box Width: 100
Max Box Height: 100
Prompt: canopy
|
|
39.9280322N,105.0946175W
|
Zoom To: 1:670
Score Threshold: 0.44
Max Box Width: 300
Max Box Height: 200
Prompt: semi
|
|
39.9237282N,105.0946557W
|
Zoom To: 1:670
Score Threshold: 0.42
Max Box Width: 100
Max Box Height: 200
Prompt: semi
|
This concludes the ENVI Feature Assistant Classification Tutorial. For more information about the capabilities presented here, refer to ENVI Feature Assistant Help.